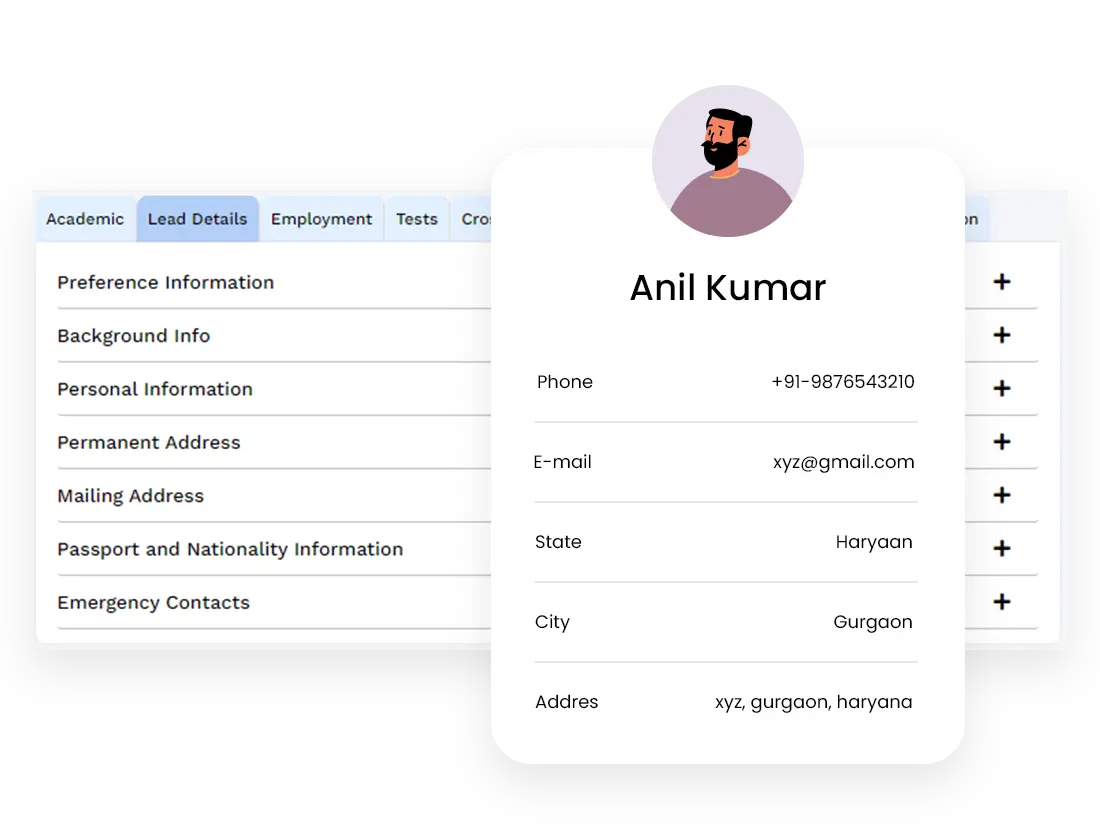
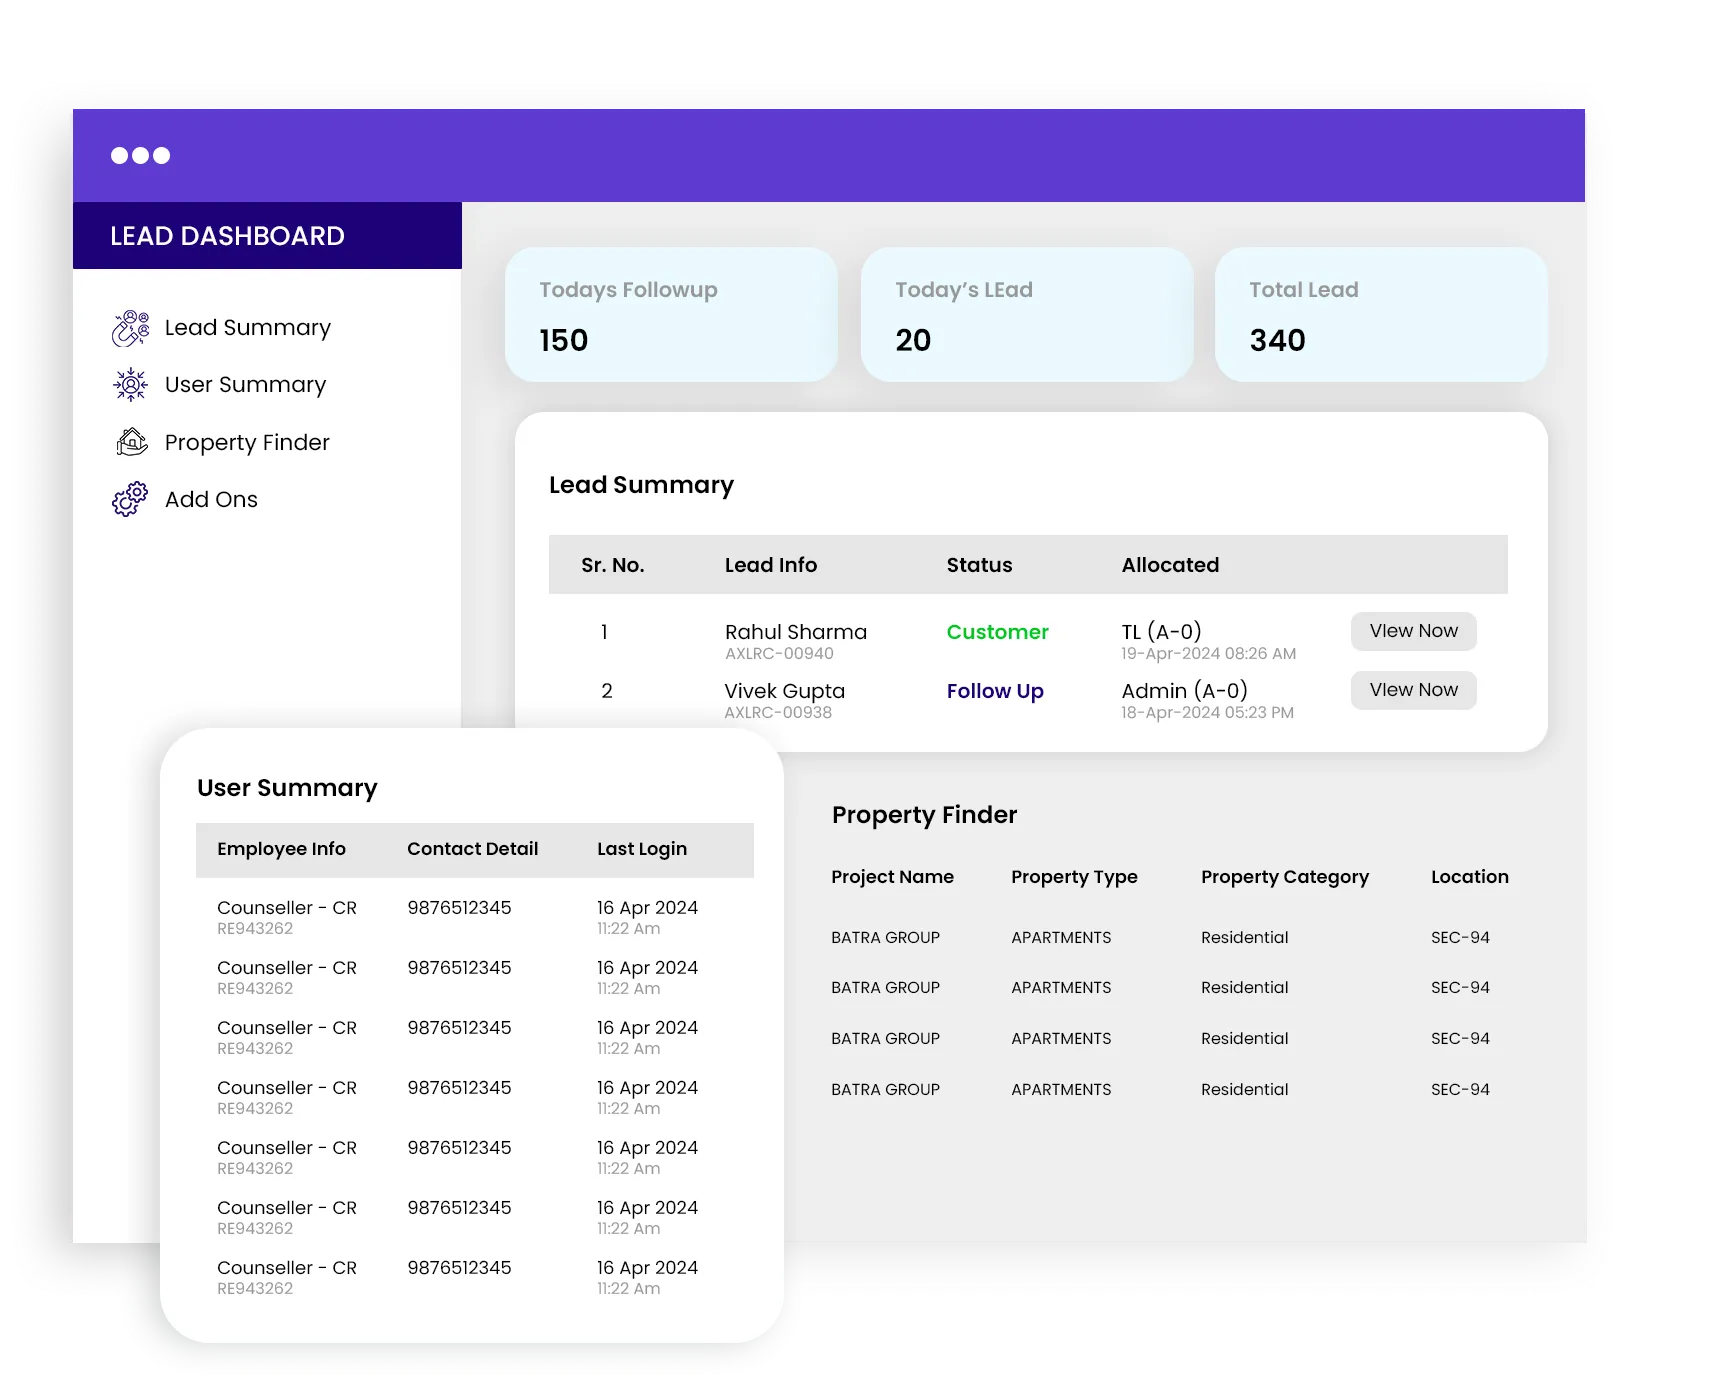
Property Finder
Welcome to the Property Finder Module Training Manual. This manual aims to provide comprehensive guidance on managing essential Property Finder features within the CRM system. The Property Finder module in TiggerOn CRM centralizes data and provides efficient sub-modules for managing developers, cities, locations, property categories, property types and projects. Let's delve into each feature and functionality in detail:
Developer
The Developer module serves as a centralized database for storing and organizing details about various real estate developers. Real estate professionals can add new developers to the CRM system by providing essential details.
Add Developer
Counters
Filters
List
Activate/Deactivate
Delete
Edit
Add Developer
Follow these steps to add a developer:
- Click on the "Add Developer" option.
- Provide the necessary information, especially the Developer Name.
Counters
Counters play a pivotal role in providing quick insights into the current status of developers. There are three counters available:
- Total Developer: Click to view a list of all developers.
- Active Developer: Click to view a list of active developers.
- Inactive Developer: Click to view a list of inactive developers.
Filters
Filters are used to refine the data displayed on the Developer dynamically according to your specific requirements. You can utilize filters to focus on specific criteria such as Developer Name and Developer Reference ID.
List
View developer's details including Display Developer ID, Developer Name, Developer Reference ID and Action Buttons.
Activate or Deactivate
The activation or deactivation process in a CRM system typically involves enabling or disabling certain functionality within the CRM. This functionality is often utilized to control the visibility, usability, or status of specific elements based on business needs. Follow the following steps:
- Activate or deactivate the developer as per the requirement.
- By default, the status of the developer is set to be active.
- If you want to change the status of the developer then click on the Activate/Deactivate button in the Action menu in the list and vice versa.
Delete
Delete: In this section, users can delete the developer permanently. The "Delete" functionality in the Developer Management module of a real estate CRM allows users to permanently remove a developer from the system after deactivation. Follow the following steps:
- Before deleting a developer, ensure that the developer is deactivated. This is typically done by changing the status of the developer from "Active" to "Inactive.
- After deactivating the developer, a "Delete" button will appear.
- Once the developer is deactivated, click on the "Delete" button to initiate the permanent removal process.
- A confirmation prompt may appear to ensure that the user intends to delete the developer permanently. This step is crucial to prevent accidental deletions.
- Confirm the deletion by clicking on "Yes" or a similar confirmation option. This final step completes the deletion process.
Edit
Follow the following steps to modify the developer details:
- Navigate to the Developer Management section or the specific developer's profile within the CRM system.
- Click on the "Edit" button to access the editable fields associated with the developer's details.
- Once in the edit mode, you can modify developer details.
- After making the necessary modifications, look for an "Update" button to confirm and save the changes. This action updates the developer's information in the CRM system.
City
The "City" module in a real estate CRM system allows users to manage information related to cities efficiently. This module is utilized in Project Management.
Add City
Counters
List
Activate or Deactivate
Delete
Add City
Follow these steps to add city:
- Click on “Add City”.
- Add a city by selecting State and City.
Counters
Counters play a pivotal role in providing quick insights into the current status of cities. There are three counters available:
- Total Cities: Displays a list of total cities.
- Active Cities: Shows a list of active cities.
- Inactive Cities: Provides a list of inactive cities.
List
View city details including Show City ID, City Name, State Name, Status (Active or Inactive) and Action Buttons.
Activate or Deactivate
The activation or deactivation process in a CRM system typically involves enabling or disabling certain functionality within the CRM. This functionality is often utilized to control the visibility, usability, or status of specific elements based on business needs. Follow the following steps:
- Activate or deactivate the city as per the requirement.
- By default, the status of the city is set to be active.
- If you want to change the status of the city then click on the Activate/Deactivate button in the Action menu in the list and vice versa.
Delete
In this section, users can delete the city permanently. The "Delete" functionality in the city management module of a real estate CRM allows users to permanently remove a city from the system after deactivation. Follow the following steps:
- Before deleting a city, ensure that the city is deactivated. This is typically done by changing the status of the city from "Active" to "Inactive”.
- After deactivating the city, a "Delete" button will appear.
- Once the city is deactivated, click on the "Delete" button to initiate the permanent removal process.
- A confirmation prompt may appear to ensure that the user intends to delete the city permanently. This step is crucial to prevent accidental deletions.
- Confirm the deletion by clicking on "Yes" or a similar confirmation option. This final step completes the deletion process.
Location
The Location entity in a CRM serves to organize and categorize properties based on their geographical attributes, providing a structured way to manage and retrieve property information.
Add Location
Counters
Filters
List
Activate/Deactivate
Delete
Edit
Add Location
Follow these steps to add a location:
- Click on “Add Location”.
- Add a location by selecting State, City, and providing Location Name.
Counters
Counters play a pivotal role in providing quick insights into the current status of location. There are three counters available
- Total Location: Displays a list of total locations.
- Active Location: Shows a list of active locations.
- Inactive Location: Provides a list of inactive locations.
Filters
Filters are used to refine the data displayed on the location dynamically according to your specific requirements. You can utilize filters to focus on specific criteria such as Location Name, Select State and Select City.
List
View location details including Display Location ID, Location Name, State, City and Action Buttons.
Activate or Deactivate
The activation or deactivation process in a CRM system typically involves enabling or disabling certain functionality within the CRM. This functionality is often utilized to control the visibility, usability, or status of specific elements based on business needs. Follow the following steps:
- Activate or deactivate the location as per the requirement.
- By default, the status of the location is set to be active.
- If you want to change the status of the location then click on the Activate/Deactivate button in the Action menu in the list and vice versa.
Delete
In this section, users can delete the location permanently. The "Delete" functionality in the location management module of a real estate CRM allows users to permanently remove a location from the system after deactivation. Follow the following steps:
- Before deleting a location, ensure that the location is deactivated. This is typically done by changing the status of the location from "Active" to "Inactive.
- After deactivating the location, a "Delete" button will appear.
- Once the location is deactivated, click on the "Delete" button to initiate the permanent removal process.
- A confirmation prompt may appear to ensure that the user intends to delete the location permanently. This step is crucial to prevent accidental deletions.
- Confirm the deletion by clicking on "Yes" or a similar confirmation option. This final step completes the deletion process.
Edit
Follow these steps to modify the location details:
- Click on the “Edit” button..
- By default, the status of the location is set to be active.
- Modify location details as per your requirements.
Property Category
It refers to the category of the property like residential, commercial, etc. In this module, you can manage property categories and utilize all the following features:
Add Property Category
Counters
List
Activate/Deactivate
Edit
Add Property Category
Follow these steps to add a property category:
- Click on “Property Category”.
- Add a Property Category by providing a Property Category Name.
Counters
Counters play a pivotal role in providing quick insights into the current status of property categories. There are three counters available:
- Total Property Category: Shows a list of total property categories.
- Active Property Category: Displays a list of active property categories.
- Inactive Property Category: Provides a list of inactive property categories.
List
View property category details including Display Property Category ID, Property Category Name and Action Buttons.
Edit
Follow the following steps to modify the property category details:
- Click on the “Edit” button.
- Modify property category details as per your requirements.
Activate or Deactivate
The activation or deactivation process in a CRM system typically involves enabling or disabling certain functionality within the CRM. This functionality is often utilized to control the visibility, usability, or status of specific elements based on business needs. Follow the following steps:
- Activate or deactivate the property category as per the requirement.
- By default, the status of the property category is set to active.
- If you want to change the status of the property category then click on the Activate/Deactivate button in the Action menu in the list and vice versa.
Property Type
Property Types are the characteristics of the property like flats, offices, villas, apartments, etc. You can manage property types and utilize all the following features:
Add Property Type
Counters
List
Activate/Deactivate
Edit
Add Property Type
Follow the following steps to add a property type:
- Click on the “Add Property Type” button.
- Add a Property Type by selecting Property Category and providing Property Type Name.
Counters
Counters play a pivotal role in providing quick insights into the current status of property types. There are three counters available:
- Total Property Type: Display a list of total property types.
- Active Property Type: Shows a list of active property types.
- Inactive Property Type: Provides a list of inactive property types.
List
View property type details including Display Property Type ID, Property Type Name, Property Category Name, Activate or Deactivate and Edit.
Edit
Follow the following steps to modify the property type details:
- Click on the “Edit” button.
- Modify property type details.
Activate or Deactivate
The activation or deactivation process in a CRM system typically involves enabling or disabling certain functionality within the CRM. This functionality is often utilized to control the visibility, usability, or status of specific elements based on business needs. Follow the following steps:
- Activate or deactivate the property type as per the requirement.
- By default, the status of the property type is set to active.
- If you want to change the status of the property type then click on the Activate/Deactivate button in the Action menu in the list and vice versa.
Project Management
In this module, you can manage all the projects and utilize all the following features:
Add Project
Add Attender
Counters
Filters
List
Meetings Attenders List
View
Edit
Activate or Deactivate
Delete
Add Project
Follow the following steps to add a project:
- Click on the “Add Project” button.
- Add a project with comprehensive details. You have to fill details of the project.
Add Attender
You can add meeting attenders for a project. Follow the following steps:
- Click on “Add Attender”.
- Select Project Name and Attender Name.
Counters
Counters play a pivotal role in providing quick insights into the current status of projects. There are three counters available:
- Total Project: Displays a list of total projects.
- Active Project: Shows a list of active projects.
- Inactive Project: Provides a list of inactive projects.
Filters
Filters are used to refine the data displayed on the project management dynamically according to your specific requirements. You can utilize filters to focus on specific criteria such as Project Name, Property Category Name, Property Type, State, City, Location and Developer.
List
View project details including Display Project ID, Project Name, Property Type, Location Name, Meeting Attenders, View, Edit, Activate or Deactivate.
Meetings Attenders List
You can view the list of meeting attenders. Follow the following steps:
- In the project list, there is a section for meeting attenders.
- Click on the counters in the meeting attenders section.
- Access the list of meeting attenders in the Meeting Attenders section.
View
Follow the following steps to view the project details:
- Click on the “View” button.
- You can view all the details of the project.
Edit
Follow the following steps to modify the project details:
- Click on the ”Edit” button.
- You can modify the details of the project as per your requirements.
Activate or Deactivate
The activation or deactivation process in a CRM system typically involves enabling or disabling certain functionality within the CRM. This functionality is often utilized to control the visibility, usability, or status of specific elements based on business needs. Follow the following steps:
- Activate or deactivate the project as per the requirement.
- By default, the status of the project is set to active.
- If you want to change the status of the project then click on the Activate/Deactivate button in the Action menu in the list and vice versa.
Delete
In this section, users can delete the project permanently. The "Delete" functionality in the Project Management module of a real estate CRM allows users to permanently remove a project from the system after deactivation. Follow the following steps:
- Before deleting a project, ensure that the project is deactivated. This is typically done by changing the status of the project from "Active" to "Inactive.
- After deactivating the project, a "Delete" button will appear.
- Once the project is deactivated, click on the "Delete" button to initiate the permanent removal process.
- A confirmation prompt may appear to ensure that the user intends to delete the project permanently. This step is crucial to prevent accidental deletions.
- Confirm the deletion by clicking on "Yes" or a similar confirmation option. This final step completes the deletion process.
Ask about TiggerOn products, pricing, implementation, or anything else. Our highly trained reps are standing by, ready to help.